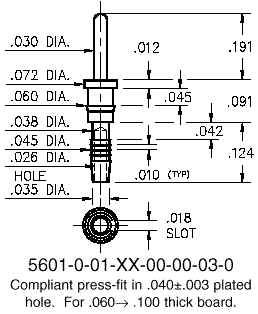
This page is dedicated to the testing that has and will be done on the proposed ground pins for Fcal 1. Although the majority of testing done for the currently proposed ground pin (the mill-max 5601-0-01-15-0000-030) was considered to be covered by the Fcal 1, Module 0 construction and subsequent testing, there have been some concerns raised over the "sturdiness" of the pin. Click HERE to see a drawing of the mill-max pin in detail. Because of the concerns that have been expressed we are in the process of completing additional testing on the mill-max pin as a ground pin.
The Ground Pin test requirements below have been agreed upon by the Fcal Engineers as a basis for approving ground pins for use in the three forward calorimeters.
Ground Pin Evaluation Procedure
- 1. The holes would be measured to an accuracy of at least 0.0005". The AZ test will have an accuracy of 0.001" due to available pin gauges.
- 2. The testing would be done on plates that were vertical. A final test would be done on plates with holes and fibers.
- 3. 200 pins would be inserted.
- 4. No measurement would be done of the insertion force.
- 5. If a retention washer is used as part of the design then it would be used in the test.
- 6. The pull out force of 5 pins would be measured.
- 7. The rest of the pins would be proof tested to 5 kg force. The AZ test will consist of proof test to 2 kg force based upon pull-out force measurements and Fcal 1 requirements.
- 8. 50 pins would be extracted.
- 9. The particulate would be collected from 10 extractions and characterized.
- 10. 10 rod removals would be simulated and the particulate collected from these tests and characterized (as the barbed pins do not have to be removed in order to remove the rod).
- 11. 50 pins would be reinserted into the holes that had pins extracted from them.
- 12. 10 pins would be bent 90 degrees to simulate accidental damage. These pins would then be removed and new pins inserted.
Ground Pin Test Progress and Results
| Although plagued by delays, the insertion portion of our 200 pin test has been completed. One of the delays was due to the loss of our original insertion tool. A new, crude copy of this tool was made to perform the current test. The tool is simply two holes drilled into a 3/8" brass rod with the 4.33 mm spacing of our ground pin pattern. The holes for placing the signal end of the pin into the tool were drilled with a #60 bit (just because that is what we had handy). The original tool was made of hardened steel and the holes were drilled with a #63 bit. A more precise tool will be made for actual insertion of ground pins into Fcal 1 as the crude tool required some additional work to line up the pins before insertion. Despite the crudeness of the insertion tool the insertion test went very smoothly and all 200 pins with washers were inserted. Pictorial progress is shown below:
|
![[Pin Tool!]](images/Construction/pintool.jpg)
Crude Pin Insertion Tool Used in Pin Test
|
| The test block was initially pin gauged with gauges spaced at 0.001" intervals. The field of holes that were drilled with what appears to be a #57 drill bit were chosen for the test based upon measurements with pin gauges. The largest gauge that would go into the hole in any fashion, in this field, ranged from 0.041"-0.044" (with the majority of holes falling in the 0.042"-0.043"). The largest gauge that would go all the way to the bottom of the holes ranged from 0.038"-0.041" (the majority of these values fell in the 0.039"-0.040" range). Since our earlier pin tests indicated a hole measurement of 0.040" as a minimum size, this is the only field of holes that could be used for pin insertions. All of the other fields were too small to use for the insertion test.
|
![[Pin Test Set-up!]](images/Construction/ptsetup.jpg)
Pin Test Set-up in Cleanroom
|
| The test was performed on the test block drilled and sent to us by the Carleton University Fcal group. In order to assure consistency in standards of cleanliness the mill-max pins inserted were also those delivered to us from Carleton. The brass and kapton washers were those that we had purchased for use with FCal 1, Module 0. All aspects of the testing have been conducted in our cleanroom (including the pin gauge measurements) which has recently been confirmed to comply with class 100 standards. Particulate measurements in the work area where the pin tests were done comply with requirements for a class 10 cleanroom so outside particulate contamination should not be of concern in interpreting these results.
|
![[Pin Test - 200!]](images/Construction/pins.jpg)
200 Insertions of the Mill-Max Pin with Kapton and Brass Washers
|
| Here is a close up side view of the front face of the test block with pins and washers inserted. All of the pins appear to be well seated and sturdy. I have tried "wiggling" the pins and have found none that are loose in any fashion. There do not appear to be any bent-over or broken pins in any of the 200 insertions.
|
![[Pin Test - 200!]](images/Construction/pins_cu.jpg)
200 Pin Test Block
|
| Here is a close up of the side face of the same test block. Again, there do not appear to be any pins that are broken, bent-over, or defective in any fashion. There are some that appear to have a slight mis-alignment which should be recified in actual production by using an insertion tool with smaller seating holes for the ground pins and an alignment assembly on the tool to assure each set of pins are normal to the face of the module. This will make insertion of the interconnect boards an easier task.
|
![[Pin Test - 200!]](images/Construction/pins_side.jpg)
200 Pin Test Block (side view)
|
| The next step to the pin test will be to remove the pins as outlined in steps 6, 7, 8, and 9 above. Although we would like to design some type of extraction tool, in the interest of time we used the tool we have used in the past, a needle-nosed vise grip. Step 6 above has been completed with the results below in "The 5 Pin Pull-out Force Measurement Test". The test plate was removed from the cleanroom and placed in a table vise, face side down. The needle-nose pliers were attached to the signal portion of the pin while a copper wire loop was placed through the opening at the bottom of the jaws. A weight hanger (1 kg) was hung from the wire loop and additional 1 kg lead weights were placed on the holder. All pull-out measurements below include the hanger weight.
|
![[Pin Extraction Tool!]](images/Construction/pinextracttool.jpg)
Ground Pin Extraction Tool Used in Test
|
The 5 Pin Pull-Out Force Measurement Test
- Pin 1 required a 4 kg pull-out (hole gauged at 0.043" top and 0.041" bottom).
- Pin 2 required a 7 kg pull-out (hole gauged at 0.043" top and 0.041" bottom).
- Pin 3 required a 4 kg pull-out (hole gauged at 0.043" top and 0.039" bottom).
- Pin 4 required a 5 kg pull-out (hole gauged at 0.043" top and 0.039" bottom).
- Pin 5 required a 5 kg pull-out (hole gauged at 0.043" top and no measurement is available for the bottom of the hole).
| Here is the set up for completion of steps 8 and 9 above. The first 10 extractions (with collection of particulate) will be done in the top row, upper left-hand corner of the test block. After the 10 pins were extracted I checked the lucite plate for any particulate. I did not see any under the microscope or with the naked eye. I then took one of the foam swabs (saturated in isopropyl) and swabbed the lucite plate. An examination under 40X magnification showed no signs of metal particulate on the swab. Both microscopic examinations showed no metal particulate but there was some dust/dirt in both the slide and swab investigations. It should be noted that this portion of the test is NOT being done in the cleanroom.
|
![[10 Pin Extraction Set-up!]](images/Construction/pinextractsetup3.jpg)
10 Pin Extraction Set-Up
|
| A field of 50 pins has been extracted from the upper left-hand corner of the test block. During the extraction process there were no problems in removing the pins. Upon inspection about 4 of the pins were bent, I believe this happened during the extraction process (under the microscope the bend in the pin corresponded to the jaw mark from the vise grips used in the extraction). There were no cracks or breaks in any of the pins. A complete microscopic examination of all extracted pins is being done by one of our students, Max. His findings are available HERE .
|
![[50 Pin Extraction!]](images/Construction/pin50extract.jpg)
50 Pin Extraction
|
| All 50 extraction holes above have had pins and washers reinserted (step 11 above). The test block was then turned face down in the table vise and each pin was proof tested to 2 kg, including the re-inserted pins. The specific holes for each pin insertion and re-insertion are outlined on the diagram to the side. The results were as follows: Each pin held the 2 kg proof test weight with 2 exceptions. One pin pulled out completely. An inspection of this pin under the microscope indicates it had very little copper particulate on it which is what we would expect for a pin that did not proof test to 2 kg. The pin was not damaged in any manner. The other pin that failed broke at the base. In this case there was a perpendicular force accidentally applied to the pin during the testing procedure.
|
![[200 Pin Test Block Schematic!]](images/Construction/test.gif)
200 Pin Test Block Schematic
|
| The final step in this ground pin test is the damage simulation portion. For this I took a hammer and hit 8 sets of ground pins (16 pins) with a sideways blow. 3 sets of pins (6 pins) broke at the base from the damage impact. The remaining 5 sets (10 pins) had the signal end straigtened (sometimes this resulted in the signal end breaking completely off) and then pulled out with the needle-nose vise grips. The remaining 10 pins that did not break from the impact pulled out without further incident.
|
![[Damaged Pins in Pin Test!]](images/Construction/ptdamage.jpg)
Damaged Pins to Simulate Possible Pin Damage During Construction or Shipping
|
| The six holes where pins broke off were drilled out with a manual drill. Since this is still being done in Lab 346 no additional measures were taken to protect against particulate contamination. In actual construction of FCal 1 the manual drill would be used through a tygon tube attached to a vacuum. This method was used in the production phase of FCal 1, Module 0. New pins and washers were then re-inserted in all 16 holes without any problems. This concludes the 200 Pin Test as outlined at the beginning of this document.
|
![[Broken Pins Being Drilled Out!]](images/Construction/drillout.jpg)
Broken Pins Being Drilled Out for Re-Insertion of New Pins
|
| Step 10 of the ground pin test addresses the possible problem of particulate from rod extractions. The picture opposite this text shows the rod extraction set-up in the clean room. A lucite plate (18" x 24") was clamped to the table below the module to collect the particulate from 10 rod extractions. After the 10 extractions the plate and module carrier were swabbed with a foam swab soaked in isopropyl alcohol. There were 18 pieces of what appears to be copper ranging in size from ~10-50 microns. There was one larger piece, ~200x300 microns, that appears to be brass in origin. Since I also pulled 6 ground pins to remove these 10 rods it is possible it could be from a ground pin. These are original FCal 1, module 0 pins and rods. The ground pins for module 0 were put into much tighter holes than is proposed for actual production. All ground pins were removed without breaking but they were compressed at the base unlike the ground pins inserted in the test block for this test.
|
![[Rod Extraction Set-up!]](images/Construction/rodpull3.jpg)
Rod Extraction Set-up, FCal 1, Module 0 in AZ Cleanroom
|
| This is the last portion of our ground pin test and was not part of the original test criteria. In this portion I broke off 10 ground pins in FCal 1, Module 0 and drilled them out using the drill bit encased in a tygon tube hooked up to a shop vac. The purpose of this set-up is to minimize particulate contamination of the module and cleanroom. Using the same particulate collection methods as for the rod extractions above we drilled out all 10 ground pins then swabbed the face of the module, carrier, and the lucite plate with a foam swab saturated in isopropyl alcohol. Examination of this swab under the electronics lab microscope showed three small pieces of black stuff (I am not sure what this is but it may be old cutting fluid from the ground pin holes) about 100 microns in size and then some fine copper dust was on the swab. I could not see the actual size of this dust as it was out of range for the microscope I was using but you could see reflected light off the dust. The copper dust looked like very fine glitter under the scope.
|
![[Ground Pin Drill Out!]](images/Construction/pindrillcr.jpg)
Ground Pin Drill Out Set-up in Cleanroom
|
|

